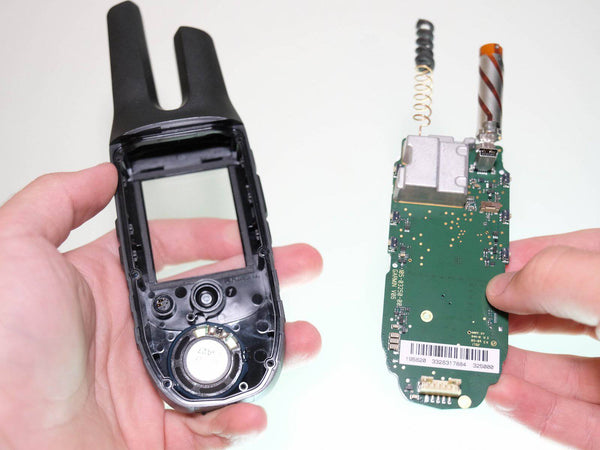
Quick answer: Most Garmin Rino 700 radio problems are caused by incorrect channels or privacy codes, low volume or squelch settings, a weak battery, or terrain blocking the signal rather than a failed radio. Start with a close range communication test before opening the device. If the Rino 700 still cannot transmit or receive after checking the settings, battery, PTT button and antenna, inspect the hardware for physical damage, moisture or corrosion. A damaged antenna or button assembly may be repairable, while a failed radio circuit usually requires board level repair or replacement.


Settings That Break Communication
The first step is to confirm that both radios are configured correctly. The Garmin Rino 700 requires the radios to use the same channel and compatible squelch settings for communication. CTCSS and DCS squelch codes can filter out transmissions when the code does not match. These codes do not make a conversation private because other users on the same channel may still hear the transmission. Garmin's documentation confirms these channel and code requirements.
| Symptom | Check |
|---|---|
| Can't hear the other radio | Confirm the same channel, matching squelch mode and code, adequate volume and an appropriate squelch level |
| Other radio can't hear you | Hold PTT while speaking, test at close range and check the PTT button for an intermittent response |
| Radio shows transmission activity but no voice is heard | Check the microphone opening, connected headset or microphone accessories and test without external accessories |
| Static or choppy audio | Move away from metal, buildings and electrical interference, hold the radio upright and check the battery level |
| Communication works only at very short distance | Test in open terrain, check the antenna and compare the result with another known good radio |
Range Expectations

Advertised radio range depends heavily on terrain and line of sight. Trees, hills, buildings and vehicles can reduce communication distance significantly. A short range problem should therefore be tested before assuming that the radio hardware has failed.
Start with both radios only a short distance apart. Confirm that transmission and reception work correctly, then gradually increase the distance. If communication suddenly becomes unreliable at a much shorter distance than expected in open terrain, continue with the antenna, battery and hardware checks below.
Contacts and Position Sharing
Rino radios can send and receive GPS position information through peer-to-peer positioning. Both units need compatible radio settings, including the same channel and code, and the device must have the required GPS reception.
If voice communication works but a contact or position does not appear correctly, do not immediately assume that the radio transmitter is defective. Check GPS reception and position sharing settings separately. Garmin states that peer-to-peer position information is sent to compatible Rino users on the same channel and code when the PTT or Call key is used.
Battery and Power
Battery condition is important when diagnosing radio transmission problems. Transmitting can require substantially more power than standby operation. A weak battery may allow the Rino 700 to appear normal during ordinary use but cause unstable operation when transmitting.
The Rino 700 uses a non-removable lithium-ion battery and Garmin lists up to 13 hours of typical battery life. The radio setup can also automatically reduce the available transmission power when the battery level is too low to support higher power operation.
Before diagnosing a radio board problem, fully charge the device and repeat the communication test. If the device dims, restarts or shuts down when PTT is pressed, battery or power related problems should be investigated before replacing radio components.
If the battery shows abnormal behavior, see the battery replacement guide.
Garmin Rino 700 Radio Diagnosis
Once basic settings have been confirmed, use a simple process to determine whether the problem is caused by the controls, power system, antenna or radio hardware.
Step 1: Test with a known good radio
The easiest way to isolate a communication problem is to test the Rino 700 against another compatible radio. Set both devices to the same channel and squelch code, then perform a short range transmission test.
- If the Rino 700 receives but cannot transmit, focus on the PTT control, microphone, antenna, power system and transmitter circuit.
- If it transmits but cannot receive, inspect the speaker, volume settings, antenna and receiver circuit.
- If it cannot transmit or receive, check the antenna, power system, radio configuration and main board.
- If communication works normally at close range but fails at longer distances, inspect the antenna and environmental conditions before suspecting the radio board.
Step 2: Check the PTT button
The PTT button is responsible for activating radio transmission. Press and hold PTT during a test and check whether the radio shows transmission activity.
If the transmission indicator does not respond consistently, the button or keypad assembly may have a mechanical or electrical problem. Dirt, wear, impact damage or liquid intrusion can cause intermittent button operation.
For related button problems, see the Garmin Rino 700 keypad and buttons repair guide.
Step 3: Check the microphone and audio path
If the radio indicates that it is transmitting but the other radio cannot hear your voice, check the microphone opening and make sure it is not blocked by dirt or debris. If a headset or external microphone is connected, remove it and test the built-in microphone again.
The Rino 700 supports compatible headset and microphone accessories through its 2.5 mm jack, so an accessory or connection problem can sometimes be mistaken for an internal radio failure.
Step 4: Check the battery under transmission load
Fully charge the Rino 700 and repeat the test while pressing PTT. If the unit suddenly shuts down, restarts or behaves differently only during transmission, investigate the battery and power circuit before replacing radio components.
Step 5: Inspect the antenna
Check the antenna carefully for cracks, bending, looseness or visible physical damage. Also inspect the antenna base and surrounding housing for signs of impact, moisture or corrosion.
A damaged antenna can cause poor range or unstable transmission. Do not continue transmitting repeatedly if you suspect a serious antenna or RF path problem.
Step 6: Inspect for water or corrosion
The Rino 700 has an IPX7 water rating, but damaged seals, a cracked housing or improper previous repair can affect water resistance. If the device has been exposed to water and later develops radio problems, inspect the relevant internal areas for moisture or corrosion.
Corrosion around connectors, contacts or circuit board components can cause intermittent communication problems and may require board level cleaning or repair.
Garmin Rino 700 Repair Process
After the basic diagnosis identifies a likely hardware problem, follow a controlled repair process rather than replacing multiple parts at once.
1. Confirm the fault before opening the unit
Record the original symptoms before disassembly. Determine whether the Rino 700 can transmit, receive, produce audio, respond to PTT and maintain power during transmission.
This gives you a baseline for comparison after the repair.
2. Power down and prepare the device
Turn the device off and disconnect external accessories before opening the housing. Work on a clean, dry surface and avoid introducing dust or moisture into the device.
Because opening the housing can affect water resistance, only proceed if you are comfortable working on electronic devices.
3. Inspect the housing and sealing areas
Look for cracks, deformation, damaged seals, corrosion or signs that the device has previously been opened. Damage around the housing can be important because it may explain both mechanical and radio problems.
4. Inspect the antenna and RF connection
Check the antenna connection and surrounding circuit area for physical damage, loose connections, corrosion or contamination. If the antenna itself is damaged, replacement may be appropriate.
Do not substitute an arbitrary antenna. The replacement should be appropriate for the radio and its operating frequencies.
5. Inspect the PTT and keypad assembly
If the radio does not enter transmission mode reliably when PTT is pressed, inspect the button mechanism and associated contacts. An intermittent PTT signal can make the radio appear to have a transmitter failure even when the RF circuitry is working correctly.
Clean or replace damaged components where appropriate, then repeat the PTT test before moving to deeper board diagnosis.
6. Inspect the circuit board
If the antenna, PTT, microphone and battery all appear normal, inspect the main circuit board for corrosion, damaged components, cracked solder joints or signs of previous liquid exposure.
Radio frequency circuits are more difficult to diagnose than simple button or battery faults. If the transmitter or receiver section of the board has failed, component level repair requires appropriate RF test equipment and experience.
7. Replace or repair the failed component
Repair only the component that has been identified as defective whenever possible. Replacing the antenna, button assembly or other accessible component is different from repairing a failed RF circuit on the main board.
If the radio module or RF section has failed, board level repair or replacement may be more practical than attempting an unverified component replacement.
Antenna and Hardware Inspection

- Inspect the antenna for bends, cracks or looseness.
- Check the antenna base and surrounding housing for impact damage.
- Look for moisture, oxidation or corrosion around the antenna area.
- Check the PTT button for inconsistent or intermittent operation.
- Check the microphone opening for blockage or contamination.
- Check the battery behavior while transmitting.
- Inspect the circuit board if all external checks pass but the radio still fails.
If settings, battery, PTT, microphone and antenna all check out and the unit still will not transmit or receive, the radio module or RF section may have failed. This type of problem is normally more difficult than a simple component replacement and may require professional board level repair.
Testing the Rino 700 After Repair
Do not consider the repair complete simply because the device powers on. A radio repair should include a communication test.
Test 1: Power and controls
- Turn the Rino 700 on and confirm normal startup.
- Check the battery level.
- Test the PTT button several times.
- Confirm the volume and squelch controls operate normally.
Test 2: Receive test
Use another compatible radio to transmit to the repaired Rino 700 at close range. Confirm that the Rino 700 receives clear audio without excessive static or intermittent loss.
Test 3: Transmit test
Transmit from the repaired Rino 700 to the second radio. Confirm that the second radio receives clear voice audio and that the Rino 700 remains powered on while transmitting.
Test 4: Range test
Move the radios farther apart in open terrain and repeat the test. Avoid using buildings, vehicles or heavy vegetation as the first range test because environmental conditions can make a good radio appear defective.
Test 5: GPS and position sharing
After radio communication has been restored, verify GPS reception and peer-to-peer position sharing separately. A working voice radio does not automatically mean that every GPS related function has been restored.
A Note on Rules
Two-way radio rules vary by country and radio service. In the United States, the Rino 700 uses GMRS channels, and GMRS transmission generally requires an FCC license. Check the regulations for your location and use the radio only as permitted. Garmin also lists different channel configurations for other regions.
Frequently Asked Questions
Why can't my Garmin Rino 700 transmit?
First check the channel, squelch mode and code, then test the PTT button and battery. If the radio enters transmission mode but the other radio receives nothing, inspect the antenna, microphone, power system and RF section.
Why is my Rino 700 range so short?
Terrain, trees, buildings and vehicles can reduce range significantly. Test the radio at close range first and then in open terrain. If the range remains unusually short, inspect the antenna and RF path.
Why does my Rino 700 shut off when I press PTT?
A weak battery or power problem can become noticeable when the transmitter draws more power. Fully charge the device and repeat the test. If the problem continues, inspect the battery and power circuit before diagnosing the radio board.
Why does my Rino 700 show transmission but nobody hears me?
Check the channel and squelch code first. If the settings are correct, inspect the microphone, PTT control, antenna and transmitter circuit. Test with a known good compatible radio at close range.
Why can my Rino 700 receive but not transmit?
Check the PTT button, battery behavior, microphone and antenna. If receiving works normally but transmitting does not, the fault may be in the PTT path, power system, antenna or transmitter section of the radio board.
Can the Rino 700 talk to another Rino radio?
Rino radios can communicate when compatible radio settings are used. Both radios need the appropriate channel and matching squelch settings or codes. Check the exact models and regional radio configuration before testing.
Can the Rino 700 antenna be repaired?
A physically damaged antenna is generally better treated as a replacement issue rather than a repair. Before replacing it, confirm that the short range problem is not caused by settings, battery condition, terrain or another fault in the radio system.
Should I replace the radio board if the Rino 700 will not transmit?
Not immediately. First confirm the channel and code, test with another radio, check PTT operation, battery behavior, microphone and antenna. Only consider board level repair or replacement after these simpler causes have been eliminated.
Unofficial repair information for educational purposes. Opening the unit may void warranty and affect water resistance. Garmin and Rino are trademarks of Garmin Ltd.; this site is not affiliated with Garmin. This guide covers the Rino 700, not the Rino 750, 750t or 755t, which have different hardware designs.